By using this site you agree to the use of cookies by the company in accordance with the Privacy Policy
Buying a Velcro Abrasive Disc looks simple until grit, backing, heat, and machine compatibility affect the result. In a workshop, the wrong disc can clog after a few passes, leave swirl marks, or detach from the backing pad. These small failures waste more than material. They also consume labor, electricity, and finishing time.
Industry data shows why selection deserves attention. Grand View Research identifies steady growth in the global abrasives market, driven by automotive, metalworking, woodworking, and industrial manufacturing. MarketsandMarkets also reports expanding demand for coated abrasives, supported by faster finishing processes and improved surface-quality requirements. These reports describe broad market trends, not a guarantee for every product. Still, they reveal an important reality: buyers increasingly value consistent cutting performance, longer disc life, and reduced changeover time.
This guide presents seven practical tips for choosing the right Velcro Abrasive Disc. It examines abrasive material, grit sequence, backing strength, hole pattern, operating speed, dust extraction, and supplier reliability. Product labels can be confusing. Sometimes, a cheaper disc performs well on softwood but fails quickly on stainless steel. That difference is easy to miss during a quick purchase. A useful comparison should include removal rate, finish quality, heat buildup, and cost per completed part. Not just the unit price.
The advice reflects common workshop experience and manufacturer specifications. However, no single disc suits every application. Test a small pack first. Measure the surface result. Then reconsider the purchase.
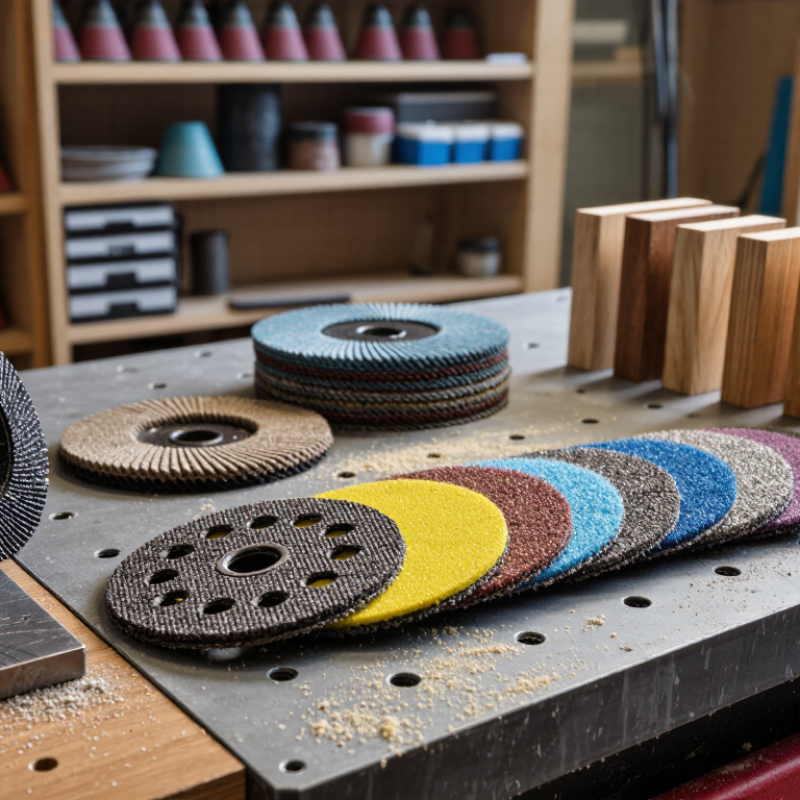
Tip 1: Match the disc diameter to your sander’s backing pad. Common sizes include 3, 5, and 6 inches. A disc that extends beyond the pad can catch an edge, tear, or mark the workpiece. Tip 2: Check the tool’s orbit size. A fine orbit often suits controlled finishing, while a larger orbit removes material faster. Tip 3: Confirm the center hole pattern before buying. Some sanders need dust-extraction holes aligned with the pad.
Tip 4: Choose the backing type according to pressure and surface shape. Paper-backed discs are economical and work well on flat surfaces. Film-backed discs resist tearing and usually flex more smoothly around curved edges. Tip 5: Inspect the hook-and-loop connection. Dense, evenly formed hooks should hold the disc firmly without excessive movement. It should peel away cleanly. Tip 6: Consider abrasive grit with the backing. Coarse grits need stronger support because they remove material aggressively. Fine grits benefit from flexible backing that follows small contours.
Tip 7: Test one disc before purchasing a full pack. I once selected the correct diameter but overlooked the pad’s hole layout. Dust extraction suffered, and the abrasive loaded sooner than expected. A short test on scrap material reveals lifting edges, clogging, and uneven scratch patterns. Also, store discs flat and dry. Heat and moisture can weaken the adhesive layers and distort the backing.
Buying Velcro abrasive discs starts with the material, not the disc color. Identify whether you are sanding wood, painted metal, plastic, or filler. Check the surface hardness and coating thickness. Soft pine and cured steel need different cutting behavior. Lower grit numbers remove material quickly. Higher grits refine the finish. Do not use fine grit too early. I have made that mistake, and the disc loaded before the panel became even.
For rough wood shaping, try 40 to 80 grit with light pressure. For paint removal, 80 to 120 grit often provides better control. Bare metal may need 60 to 100 grit for scale or scratches. Use 120 to 180 grit before priming, based on the required finish. Plastic deserves caution. Start near 180 grit and test a hidden area. Heat can soften plastic and clog the abrasive. Test first.
Match disc speed to the tool’s rated range. Let the abrasive cut; pressing harder usually creates heat. Replace discs when cutting slows, not only when they look worn. Keep separate discs for different materials. Cross-contamination can create unexpected scratches. Use dust extraction when sanding produces fine particles. Inspect the surface under angled light between grit changes. Skipping a grit can save time, but it may leave scratches that primer cannot hide. I sometimes move too quickly here. A small test patch usually exposes that decision.
Buying Velcro abrasive discs is easier when material choice comes before price. Aluminum oxide suits general wood sanding and removes paint quickly. Silicon carbide cuts sharply on glass, stone, and painted surfaces, but it can wear faster. Zirconia alumina handles stainless steel and tough metals with stronger grain action. Ceramic grain stays aggressive under pressure and often lasts longer, although it may feel too harsh on soft timber.
Match the disc to the workpiece, not just the machine. A 120-grit disc can leave a clean finish on hardwood, yet it may clog on resinous pine. That detail matters.
Check the backing, too. A flexible cloth backing follows curved edges, while paper backing feels smoother on flat panels. Hook-and-loop attachment saves time, but dust can weaken the grip when the pad is overloaded. Clean the hooks regularly. Use an open-coated disc for wood and a denser coating for metal finishing. Test one disc on an offcut first; surface temperature and pressure change real results. I once pressed too hard on a painted panel and blamed the abrasive, though heat caused the smearing. Use light pressure, steady movement, and vacuum extraction when possible. Inspect the disc after each pass. Uneven wear usually signals poor alignment or excessive force. Do not chase durability alone. The longest-lasting disc may leave scratches that require extra finishing work.
Buying Velcro abrasive discs starts with the sander, not the grit. Measure the backing pad carefully. The disc diameter must match it exactly. Fit matters. Check the hole pattern, hook density, and pad firmness. A loose connection can cause vibration, uneven scratches, or disc release. A disc that overhangs the pad creates another hazard.
The U.S. Occupational Safety and Health Administration reports that hand injuries exceed one million cases annually, making secure tool control essential. Before sanding, compare the disc’s maximum RPM with the sander’s rated speed. Also check whether the pad suits random-orbit, orbital, or rotary motion. These tools do not produce identical heat or scratch patterns. Dust-extraction holes must align with the pad. Otherwise, abrasive dust quickly fills the surface and reduces cutting performance.
Work process matters just as much. For paint removal, a tougher backing may last longer; for finish sanding, a flexible disc can follow curved edges. The 2024 Global Abrasives Market report by Grand View Research estimated the market at about 47 billion dollars in 2023, with continued growth expected through 2030. More choices do not guarantee a better result. I have seen operators select the correct diameter but ignore pad wear. That mistake wastes discs. Inspect the hooks, clean the pad, and test one disc on scrap material before full production. Test it first.
Buying Velcro abrasive discs requires more than choosing the lowest price. In workshop trials, disc quality appears in the first few minutes: uneven grain leaves bright scratches, while weak hooks lift at the edge. Check the backing, grit consistency, hole pattern, and heat resistance. Grand View Research estimated the global abrasives market at roughly US$47 billion in 2023, showing how many suppliers compete for industrial buyers. Large volume does not guarantee stable performance.
Quantity affects cost, but storage matters. A 500-disc carton may reduce the unit price, yet moisture, dust, and poor packaging can damage unused discs. Compare usable discs per carton, not only the listed quantity. Record removal rates during a small trial. That test is imperfect, but it often exposes false savings. A 2024 industrial supply-chain report from Deloitte identified supplier reliability as a major factor in manufacturing continuity, not merely purchasing convenience. Ask suppliers for batch records, inspection standards, lead-time history, and replacement procedures. Request samples from two production lots. Delayed replies are a warning. Low prices deserve questions. Supplier claims should match measured results, delivery records, and clear technical documents.
| No. | Buying Tip | What to Check | Practical Benchmark | Quantity Planning | Cost Consideration | Supplier Reliability Check |
|---|---|---|---|---|---|---|
| 1 | Match the Grit to the Job | Confirm the abrasive grade is suitable for the material and finishing stage. Coarser grits remove material faster, while finer grits create a smoother finish. | Common ranges: P40–P80 for stock removal, P100–P180 for blending, and P220–P600 for finishing. | Buy a mixed trial set before committing to a single grit. Track discs used per workpiece for each grade. | Very coarse grits may reduce labor time but can increase material waste if used on delicate surfaces. | Request technical data identifying abrasive type, grit standard, and recommended applications. |
| 2 | Compare Backing and Hook-and-Loop Quality | Inspect backing flexibility, tear resistance, hook density, loop coverage, and how consistently the disc attaches to the sanding pad. | The disc should lie flat, attach evenly, and remain secure during normal use without premature edge lifting. | Test at least 10 discs from different parts of a carton to identify inconsistent bonding or cutting. | A stronger backing can cost more per disc but may lower replacement frequency and downtime. | Ask for samples and written confirmation of disc diameter, hole pattern, backing material, and attachment type. |
| 3 | Verify Disc and Hole Compatibility | Check disc diameter, center-hole arrangement, ventilation holes, and compatibility with the existing random-orbit or rotary sander pad. | Common diameters include 125 mm and 150 mm. Hole patterns must align with the tool for effective dust extraction. | Confirm the exact tool model and pad pattern before ordering more than one carton. | Incorrect hole alignment can reduce dust collection, shorten disc life, and increase cleanup costs. | Require a dimensional drawing or sample approval record before production or bulk shipment. |
| 4 | Evaluate Cutting Performance, Not Only Unit Price | Measure cutting speed, finish consistency, disc life, heat generation, and the number of discs required per workpiece. | Use a controlled comparison with the same tool speed, pressure, material, operator, and sanding sequence. | Test at least 5–10 workpieces per product option when production conditions allow. | Calculate cost per finished workpiece: disc price × discs consumed, plus labor and disposal time. | Ask for batch-to-batch performance records or conduct an incoming quality test using agreed acceptance criteria. |
| 5 | Compare Quantity Breaks Carefully | Compare pack size, carton quantity, minimum order quantity, shelf storage requirements, and the risk of unused inventory. | Typical commercial packs may contain 25, 50, or 100 discs, depending on size and application. | Base the order on forecast consumption plus a modest safety stock, rather than purchasing only for the largest discount. | Compare the delivered cost per usable disc, including freight, packaging, duties, and storage. | Confirm carton labeling, count accuracy, replenishment lead time, and policies for shortages or damaged goods. |
| 6 | Check Storage and Shelf-Life Conditions | Protect discs from excessive humidity, heat, direct sunlight, contamination, and deformation during storage. | Store abrasive discs flat in a clean, dry area at stable room conditions and rotate stock using first-in, first-out control. | Keep only the quantity that can be consumed within the supplier's stated storage period and packaging guidance. | Poor storage can cause curling, weakened attachment, or reduced abrasive performance, increasing effective cost. | Request storage instructions, production dates, packaging specifications, and traceability information. |
| 7 | Assess Supplier Reliability Before Scaling Up | Review sample response time, communication quality, quality-control process, lead time, documentation, and corrective-action capability. | A dependable supplier provides clear specifications, realistic lead times, consistent samples, and written responses to quality issues. | Start with a trial order, then increase volume only after delivery accuracy and product consistency have been verified. | Include payment terms, freight, inspection costs, replacement costs, and the financial impact of production interruptions. | Use a written specification, pre-shipment inspection where appropriate, agreed defect limits, and a documented claims process. |
By using this site you agree to the use of cookies by the company in accordance with the Privacy Policy
Have a questions or want to know more about our company? We'll be expecting you.